
 The control panel is one of the core aesthetic reasons I decided to make a cabinet. The control panel is your physical interface to the games; the joysticks, trackball and buttons.
My design for the control panel was so that it could be easily removed and interchanged with a 4-player, driving, flying, or whatever control panel in the future. Ultimately, I never ended up making any other control panels. However, being able to detach the control panel and work on it separately was very convenient.
Attachment
 On the underside of the control panel I installed 3 2×2 supports. When you lower the control panel onto the cabinet, these guides keep it from shifting around. However, to make sure it doesn’t flip out, I installed window-sash latches on each side that attach it to the cabinet. To detach it, I have to open the front door, get on my back and unlatch these sash latches.
From inside the cabinet, you can see how the 2×2 on the control panel comes down to meet the 2×2 attached to the cabinet. (The left side of the picture is the front of the cabinet.)
You can also see the 2×2 attached to the control panel that is resting against the front of the cabinet to keep it in place. I thought that I may need to install a latch on the front too, but the side latches were more than sturdy enough.
 Here’s a picture of the inside of the control panel. I wanted all of the wiring to be self-contained with just a few jacks coming out of the back. This would allow for easier swapping in the future. We’ll see how that works out when I start installing the actual controls. I hope 3″ is enough depth for the box, otherwise I’ll be re-doing some of this.
When I first installed the lid, the piano hinge caused the front edge to be lifted up about 1/4″ from where it should be. As a result, when the lid closed it didn’t sit evenly and when I simulated playing a game, the lid would move around and cause wood-banging noises…NOT GOOD! I came up with 2 unorthodox solutions:
- I purchased a roll of 3/4″ wide 1/2″ thick weatherstripping. (Kinda hard to see here because the black blends into the black background.) It’s great! It has an adhesive backing and I installed it around the perimeter of the control panel edges. Now the lid closes and has a “soft” feel to it, and no longer makes a banging noise when playing on the surface.
- I purchased a two dual-magnetic cabinet catches. I installed one on each side of the control panel. Now when the lid closes, the weatherstripping softens the close and the catches make it “click” closed. It keeps it pretty sturdy!!
mame-cp-underside
The underside of the control panel
mame-cp-assembled
Inside the assembled Control Panel

mame-cp-weatherstripping
Weather stripping and magnetic latches added.

mame-cp-magneticlatch
Magnetic catch on the underside of the lid.
Happ Controls
 I had been putting some thought into the layout, but what it really came down to was putting the parts on the control panel and moving them around to experiment with different layouts. It’s one thing to see it on paper and think it looks good, but it’s another thing to make sure the layout is comfortable!
I’ve seen dozens of layouts here on the net with 6-button configurations where the buttons are arranged in 2 even rows of 6. This makes the control panel look very nice and symmetrical, but I found it uncomfortable on my fingers. I decided I needed some sort of angle or arc configuration to make the buttons work for me.
Happ Controls - Shopping List (Click to View)
| Quantity | Item | Price | Total |
| 3 | SUPER JOYSTICK,4&8 WAY BRACKET | $13.20 | $39.60 |
| 1 | PUSHBUTTON WRENCH F/IPB,VERT | $2.15 | $2.15 |
| 1 | 3″ TRACKBALL MOUNTING KIT | $10.00 | $10.00 |
| 1 | 3″ TRACKBALL ASSY WHITE WITH | $69.99 | $69.99 |
| 5 | LONG HORZ PB RED W/.187 MS & | $0.95 | $4.75 |
| 1 | HORZ PB WT WITH MS & NUT 1 | $1.75 | $1.75 |
| 1 | HORZ PB WT W/MS & NUT 2 PLYR | $1.75 | $1.75 |
| 3 | LONG HORZ PB BLUE W/.187 MS & | $1.65 | $4.95 |
| 3 | LONG HORZ PB GREEN W/.187 MS & | $1.65 | $4.95 |
| 5 | LONG HORZ PB YELLOW W/.187 MS | $1.65 | $8.25 |
| 2 | LONG HORZ PB BLACK W/.187 MS & | $1.65 | $3.30 |
| 2 | LONG HORZ PB ORANGE W/.187 MS | $1.65 | $3.30 |
| 1 | Shipping Charges (3 Day) | $18.75 | $18.75 |
| $173.49 |
** Prices reflected are from 2001

mame-cp-happparts
All the Happ Parts

mame-cp-layout
Trying button layouts
mame-cp-joystick
Rough Joystick layout
Plexiglass Top
Be sure to LEAVE the protective paper on the plexiglass as long as possible while you are working with it. You don’t want it to get scratched up.
My control panel is 48″x19″, so I bought a 48″x24″ piece of plexiglass. This was nice since essentially I already had 3 straight edges. All that I needed to do was round the edges and cut the front edge. I used my router and a laminate-cutting bit. Basically, this bit used the wood of the control panel as a guide and trimed the plexiglass to the exact shape. I couldn’t have imagined trying to do this any other way. Thank goodness for routers!!
Next step was to route for the T-Molding that would go around the perimeter of the control panel when it was done. I needed to route for this now while the protective paper was in place! Using a scrap piece of 3/4″ wood I tested the cutting depth. Then I did a test cut in the rear to be sure it was still ok, when it was I just went all the way around. Presto.
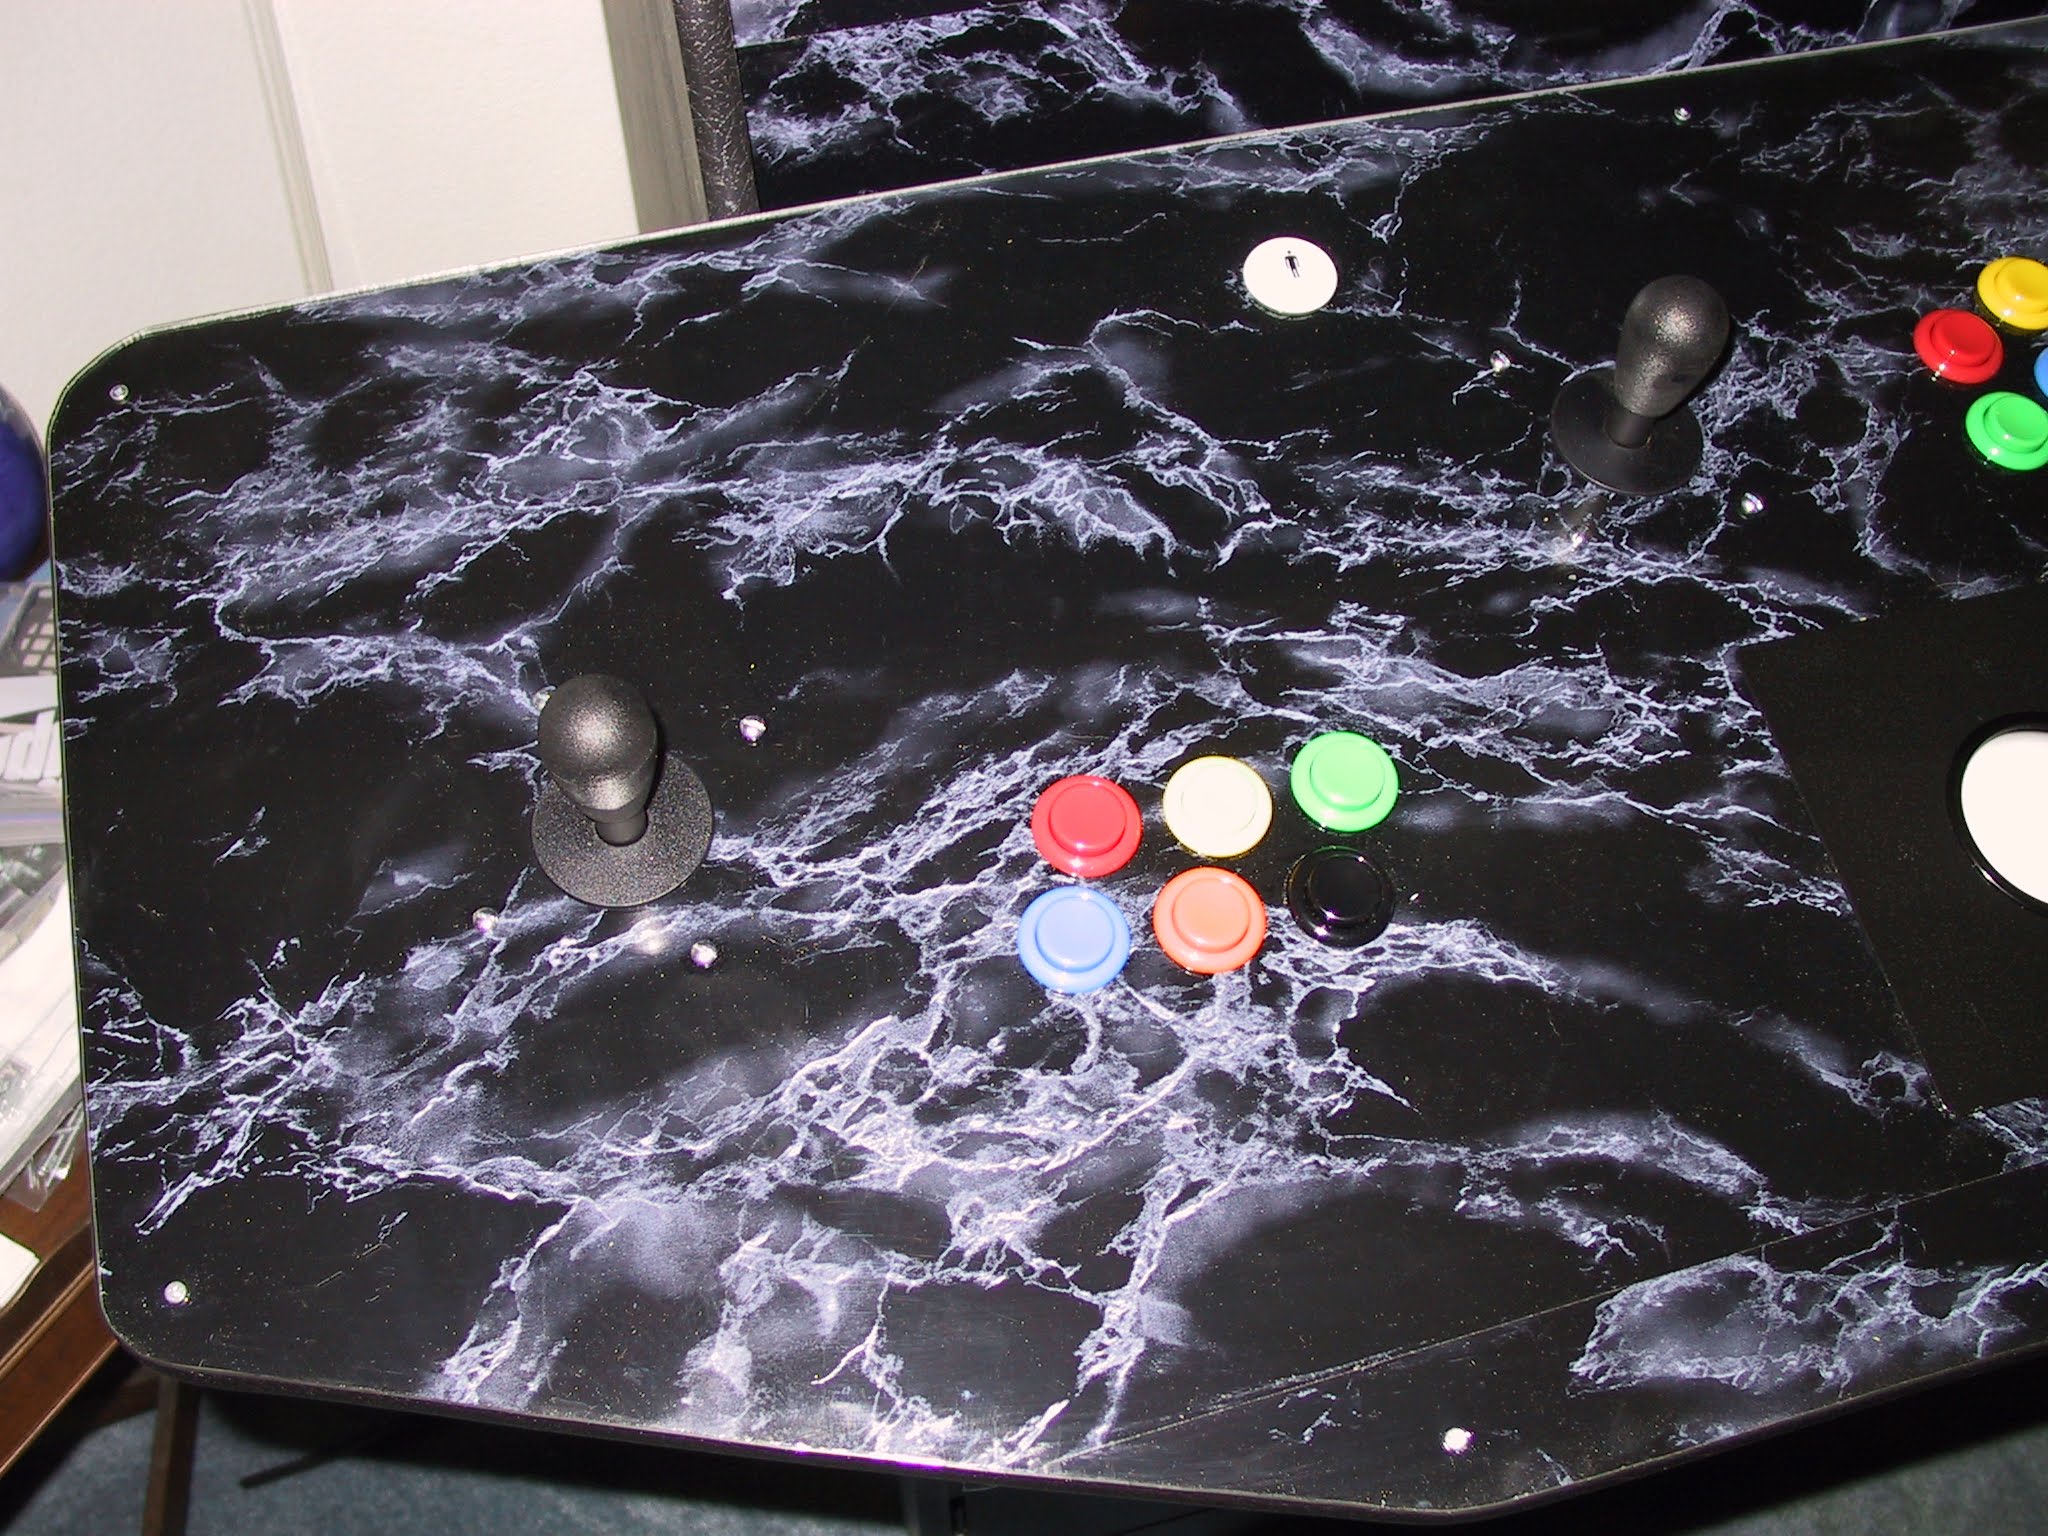
 As you can see I finally decided on 2 angled rows of buttons. Before I could begin to draw where the controls would go, I needed to measure and mark the boundaries for where the “usable” surface was. Remember, this control panel overhangs just a little. Next I needed to measure for each player’s controls. The front of the control panel is cut at an angle so I decided to align the controls for each player to this flat surface. I used a t-square to mark one-inch lines perpendicular to the front of each players area and a line across the center at 7″ from the front as a “centerline” (The picture is of the right joystick for player 2 I did the same for Player 1) I arranged the buttons so they were comfortable then used the lines to help me keep them straight. I then traced the inside of the button-nuts to mark the spots. I also went back and marked a cross-hair on each button so I knew where the center of each one was for drilling.
 After about 40 minutes of drilling and cutting, here is what it looks like. All holes are 1 1/8″ diameter, and the trackball is… well… a traced guess. :) At first glance it looks like I may have screwed up because the buttons for each player look like they are aligned completely different. But actually, they are each identical when standing at each player’s position. Like I said earlier, I didn’t care that it looked symmetrical, I just wanted it to play comfortably!!
I was now ready for installation! I took the plexiglass off the control panel and thoroughly cleaned the surface of wood on the control panel. It needs to be clean so that the contact paper installation looks nice.
 I applied the standard “black-marble” contact paper directly to the wood, being sure to get out any air bubbles as I went. After it was down, I then removed the protective paper from the plexiglass. This will cause a lot of static energy and will attract all sorts of dust, so I used some Windex and cleaned the plexiglass surface. I put down the clear plexiglass on the newly-installed contact paper and started installing the buttons and joysticks.
I used a hot-glue gun to install the T-Molding around the edge, and then dropped the control panel into the cabinet. WOW! This is REALLY starting to look like something now. YES!
The only problem I had installing the controls was with the trackball. The screws that Happ sent that attach the trackball to the mounting plate were too short. I contacted customer service and they are mailing me the correct screws.

mame-cp-drawn
Plexiglass clamped into place ready for routing

mame-cp-cut
Plexiglass cuts complete

mame-cp-joystickdrawn
Right joystick layout

mame-cp-joystickcut
Right joystick cuts
mame-cp-joystickl
Left joystick and buttons

mame-cp-joystickr
Right joystick and buttons

mame-cp-trackball
Center joystick and trackball
Wiring
I purchased 150 ft of red/white pair, solid-core “bell wire” from my local Home Depot. It turns out it was on sale for only $0.03/ft. $4.50, can’t beet it!
 I used the white wire in the pair to run 3 ground loops: One loop for the left-side player-1, one loop for right-side player-2, and one loop for the center player-1 and trackball. This way if there was a break in the ground somewhere it would be easier to find if I could isolate it to an area. Then I ran a individual red wire for each control.
Here’s a picture (sorry for the bad focus) of the connections I made on the controls. I bought a box of female crimp-connectors from the local Fry’s Electronics. The wire is crimped onto this connector, and then the connector just fits right onto the control. PLEASE, do NOT solder the wires to the controls… these connectors are very easy to install and they make for very easy changes in the future.
The Trackball

Wiring the trackball was a little spooky. The 3″ trackball from Happ costs ~$70 and I didn’t want to screw it up. According to the instructions for the IPAC controller, the first step to wiring it is to CUT OFF the trackball connector…yeah that is scary. So, realizing that the wires from the trackball would NOT be long enough to work with, I installed a terminal strip nearby and then ran red bell wire from that to the IPAC. It worked like a charm.
IPAC and OptiPAC Controllers
The IPAC Controller is a small device that plugs into the PS2 mouse and keyboard ports of my PC. After it is wired up to all the Happ controls, it will emulate the appropriate MAME keys to your PC. To your computer, it looks like a normal keypress.
 I ordered both the IPAC and OptiPAC boards. IPAC handles all of the joystick and button commands, and the OptiPAC handles the trackball. They are designed in a way so that you can mount them on top of one another. I just purchased some nylon spacers to keep the boards separated and a 2″ bolt to attach them to the bottom of the control panel.
One thing I didn’t expect was that the serial connection on the IPAC projects out and touches the front bezel. This puts a little bit of pressure on the circuit board which could be accidentally broken if I’m not careful. I did end up moving the IPAC boards 1″ back away so that the cables did not bump against the monitor bezel.
Wiring - Shopping List (Click to View)
| Quantity | Item | Price | Total |
| 1 | IPAC Keyboard controller | $39.00 | $39.00 |
| 1 | OPTIPAC Trackball controller | $39.00 | $39.00 |
| 1 | (Controller Shipping Charges) | $8.00 | $8.00 |
| 100 | Bell wire (per foot) | $0.03 | $3.00 |
| 100 | Wire connector quick disconnect | $20.00 | $20.00 |
| 1 | Terminal strip | $9.00 | $9.00 |
| $118.00 |

mame-cp-wiring
Control panel open and fully wired

mame-cp-ipac
IPAC and OptiPAC wired

mame-cp-wiringbuttons
Joystick and buttons wired

mame-cp-wiringstrip
Grounding strip near the Trackball
Other MAME Articles in this Series

My MAME Arcade Machine
You Built a WHAT?? Many years ago (early 2000's), I built a MAME arcade machine cabinet. It was an incredibly fun and challenging project, and the final machine was so much fun to play. Even today, I have an occasional conversation where I bring it up,...

MAME – Design and Plans
Any time I start a new project, I always love going out and doing research. A huge win was discovering the Build Your Own Arcade Controls website, dedicated to people who had already built MAME cabinets, and resources with how to find anything you need to...

MAME – Cabinet Cutting
Measuring it Out First step was to get the wood. I got 2 pieces of 3/4" MDF 4x8' which would be used mostly for the sides of the cabinet, the floorboards, and other parts that needed thicker support. MDF is "Medium Density Fiberboard" which is one grade higher than...
MAME – Cabinet Assembly
First order of business was to measure out and mark where all of the 2x2 supports would be attached. I figured that the kickboard was 3" and the casters I got should be mounted 2 1/4" recessed. So I measured in 2 1/4" and clamped in the first 2x2 support. This was...
MAME – Finishing Touches
First Computer System The first computer I put in was an old Pentium system I had sitting around. Specs: Compaq Pentium 166MMX with onboard video 64MB of RAM SBLive soundcard 2x CD-ROM 17" monitor Not a powerhorse by any means, but it sure does play a mean game of...